Encoding Overview
Creating movies for review should be a simple process where the movie file accurately represents the source media content, so that you can feel confident that issues with the content are not as a result of creating the movie. Sadly, this is not the case, there are many steps that can create an incorrect result, either through a color shift, or encoding artifacts. This frequently means there isn’t a single right answer for all cases, so we will attempt to document the different scenarios where you could get tripped up.
We will mostly be focusing on encoding with ffmpeg, however there will be some cases where we will recommend other tools. Splitting the process into two steps:
- Convert the source media to the target color space.
- Encode the target intermediate frames into the resulting movie.
Encoding
NOTE, We do not have any test suites for encoding a this time. This is an area for future development.
A good starting point for encoding options is here: https://trac.ffmpeg.org/wiki/Encode/VFX
H264
Key flags (see https://trac.ffmpeg.org/wiki/Encode/H.264 )
- -crf 23 - This is the constant rate factor, controlling the default quality (see: https://slhck.info/video/2017/02/24/crf-guide.html ) where -crf 0 is uncompressed. By default this is set to 23, which is a little on the low side, using values closer to 15 is recommended, but this does come at the expense of file-size. For more on this see the CRF comparison below.
- -qp 23 - Quantization Parameter - it is recommended that you do not use this, in preference to -crf above (see: https://slhck.info/video/2017/03/01/rate-control.html )
- -preset slower - https://trac.ffmpeg.org/wiki/Encode/H.264#FAQ
- -tune film - Optionally use the tune option to change settings based on specific inputs - https://trac.ffmpeg.org/wiki/Encode/H.264#FAQ - see also: https://superuser.com/questions/564402/explanation-of-x264-tune I suspect that we would want to use one of:
- -tune film good for live action content.
- -tune animation good for animated content with areas of flat colors.
- -tune grain good for live action content where you want to preserve the grain as much as possible.
- -qscale:v 9 - Generic quality scale flag: https://www.ffmpeg.org/ffmpeg.html#toc-Main-options - TODO experiment with this.
An example would be:
-preset slower -crf 11 -profile:v high -tune film
CRF Comparison
To help pick appropriate values with the CRF flag, we have run the Test Framework through some of the reference media.
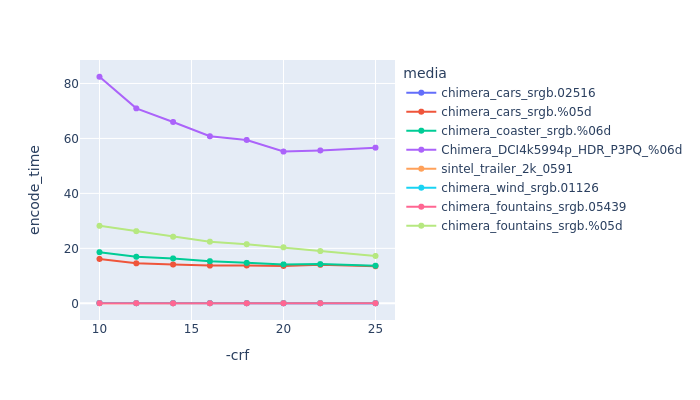 This is showing CRF values against encoding time. This is showing CRF values against encoding time. |
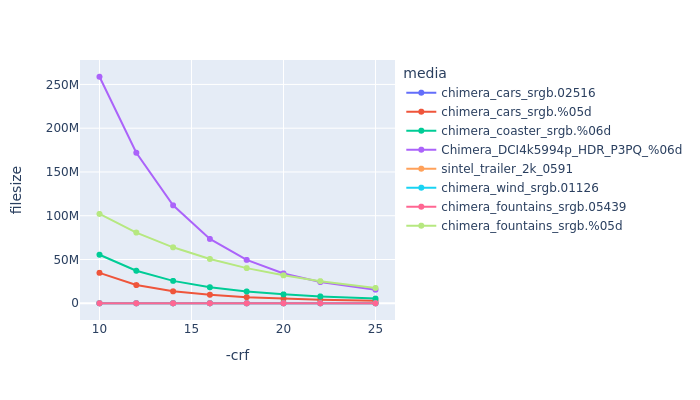 This is showing CRF values against file size. This is showing CRF values against file size. |
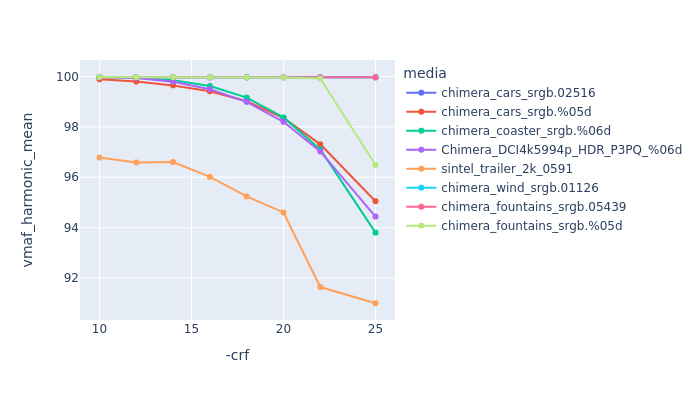 This is showing CRF values against VMAF harmonic mean This is showing CRF values against VMAF harmonic mean |
H264 Bitdepth
By default, h264 is created as a yuv420p file format. This is the recommended format for web playback and also playback with the quicktime player on OSX and other apple devices, but the h264 codec can support other formats that are modified with the -pix_fmt flag.
TODO Needs more investigation, e.g. do you set pix_fmt and profile, or will one set the other?
| -pix_fmt yuv444p10le | Defines a YUV 444 image at 10bits per component. |
| -profile:v high10 | Support for bit depth 8-10. |
| -profile:v high422 | Support for bit depth 8-10. Support for 4:2:0/4:2:2 chroma subsampling. |
| -profile:v high444 | Support for bit depth 8-10. for 4:2:0/4:2:2/4:4:4 chroma subsampling. |
ProRes
There are four Prores encoders, Prores, Prores_ks, Prores_aw and now with ffmpeg 5 VideoToolBox Prores, which is a hardware based OSX M1 encoder/decoder.
From https://trac.ffmpeg.org/wiki/Encode/VFX the recommendation is to use Prores_ks with -profile:v 3 and the qscale of 11
Options that can be used include:
-profile:v values can be one of.
- proxy (0)
- lt (1)
- standard (2)
- hq (3)
- 4444 (4)
- 4444xq (5)
-qscale:v between values of 9 - 13 give a good result, 0 being best, see below for some wedge tests.
-vendor apl0 - tricks the codec into believing its from an Apple codec.
Example encode would look like:
ffmpeg -r 24 -start_number 1 -i inputfile.%04d.png -vf "scale=in_color_matrix=bt709:out_color_matrix=bt709" \
        -vframes 100 -c:v prores_ks -profile:v 3 -pix_fmt yuv422p10le \
        -color_range tv -colorspace bt709 -color_primaries bt709 -color_trc iec61966-2-1 outputfile.mov
Using this with the usual color space flags, seems to work well with the exception of ffmpeg itself is unable to read a prores file, and convert it to a still frame. It needs the flags:-vf scale=in_color_matrix=bt709:out_color_matrix=bt709 added to the command to ensure the right input colorspace is recognised, e.g.:
ffmpeg -i INPUTFILE.mov -compression_level 10 -pred mixed -pix_fmt rgba64be \
   -sws_flags spline+accurate_rnd+full_chroma_int -vframes 1 \
   -vf scale=in_color_matrix=bt709:out_color_matrix=bt709 OUTPUTFILE.png
However, other encoders seem to be recognised correctly, so there is clearly some metadata missing. I did try using the prores_metadata filter to try adding some additional parameters, but it didn’t seem to help.
ffmpeg -i ./chip-chart-yuvconvert/basicnclc.mov -c copy \
   -bsf:v prores_metadata=color_primaries=bt709:color_trc=bt709:colorspace=bt709 \
   chip-chart-yuvconvert/basicnclcmetadata.mov
If you are on a OSX M1 machine and are using ffmpeg 5.0 or higher, you can use the built in libraries to encode to prores using:
ffmpeg -r 24 -start_number 1 -i inputfile.%04d.png -vf "scale=in_color_matrix=bt709:out_color_matrix=bt709" \
        -vframes 100 -c:v prores_videotoolbox -profile:v 3 -pix_fmt yuv422p \
        -color_range tv -colorspace bt709 -color_primaries bt709 -color_trc bt709 outputfile.mp4
NOTE, it does not appear to allow -color_trc iec61966-2-1 (sRGB) – so this needs more testing.
TODO:
- Figure out the missing metadata so that ffmpeg can correctly decode a quicktime to still.
- Add other codecs, e.g. DNxHD, AV1
- Wedge qscale values
- Do some colorspace tests with different qscale values to see where color breaks down.
- VMAF
Prores_ks -qscale:v comparison.
To help pick appropriate values with the -qscale:v , we have run the Test Framework through some of the reference media.
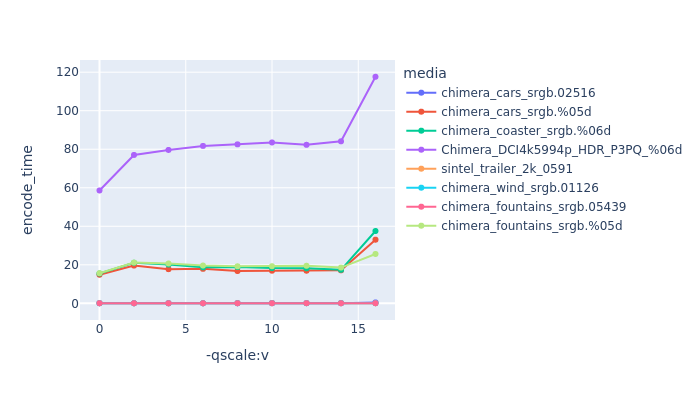 This is showing qscale values against encoding time. This is showing qscale values against encoding time. |
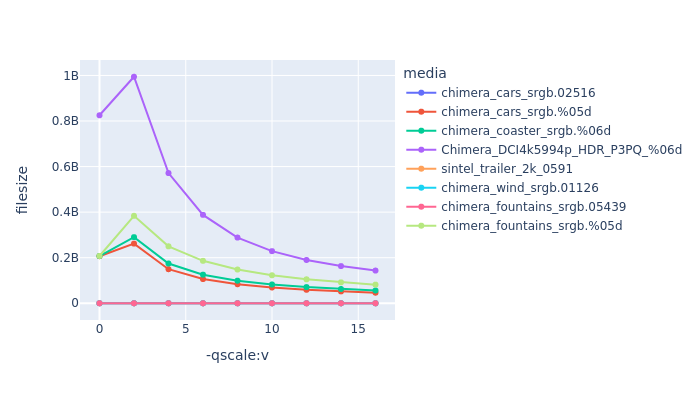 This is showing qscale values against file size. This is showing qscale values against file size. |
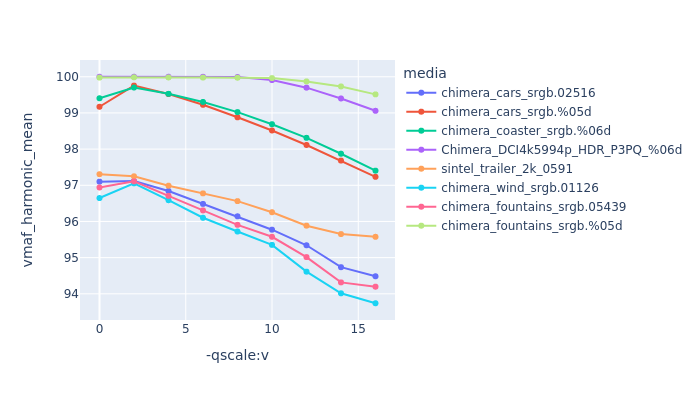 This is showing qscale values against VMAF harmonic mean This is showing qscale values against VMAF harmonic mean |